How is EPDM Roofing Installed?
March 28, 2025 7:02 pm Leave your thoughtsEPDM (Ethylene Propylene Diene Monomer) roofing is one of the most popular and durable types of roofing systems used in both commercial and residential buildings. Known for its long-lasting performance, weather resistance, and ease of installation, EPDM has become a go-to choice for flat and low-slope roofs. If you’re considering installing EPDM roofing on your building, it’s essential to understand the steps involved in the process. The EPDM roofing installation process is relatively straightforward, but like any roofing project, it requires attention to detail and proper execution to ensure the roof lasts for many years.
Preparing for EPDM Roofing Installation
Before starting the actual EPDM roofing installation steps, proper preparation of the roof deck is crucial. The surface must be clean, dry, and free from any debris, such as leaves, dirt, or old roofing materials. The first step in preparation is to inspect the roof structure for any damage. If any issues are found, they should be addressed before proceeding with the installation to avoid complications later on.
Next, the roof deck should be checked for any protrusions or obstacles like vents, pipes, or HVAC systems. These obstacles must be properly trimmed or sealed to ensure a smooth, even surface for the EPDM membrane. It’s also important to verify that the roof deck is securely fastened and level. If the roof is uneven, additional steps may be required to create a stable base for the EPDM membrane.
Once the roof deck is clean and ready, the next step is to apply a layer of insulation if needed. Insulation improves the energy efficiency of the building by reducing heat loss or gain. Once the insulation is in place, a vapor barrier may be added to prevent moisture from damaging the roof structure. Properly preparing the roof ensures that the EPDM roofing installation process goes smoothly and that the new roof will perform optimally for years to come.
Laying the EPDM Membrane
Once the roof is prepared, the next step in the EPDM roofing installation process is to unroll the EPDM membrane onto the roof surface. EPDM membranes typically come in large sheets, and these sheets can be quite heavy, so it’s essential to have enough manpower or equipment to help unroll them properly. The sheets are generally available in a range of sizes, allowing installers to minimize the number of seams on the roof, which can reduce the potential for leaks.
As the membrane is rolled out, it should be aligned with the edges of the roof, ensuring that it covers the entire surface. Care must be taken to avoid wrinkles or creases in the membrane, as these can compromise its performance. If wrinkles do form, they can be smoothed out using a roller or other appropriate tools.
During this process, it is essential to ensure that the membrane overlaps at the seams by a few inches to prevent water from infiltrating. The EPDM membrane should be installed in sections, overlapping the edges, ensuring proper alignment. If the roof is particularly large, multiple rolls of EPDM may need to be used. In such cases, it’s essential to ensure the seams are precisely matched to create a continuous, waterproof layer.
Securing the EPDM Membrane
With the membrane unrolled and properly aligned, the next step is to secure the EPDM membrane to the roof deck. There are two primary methods of securing the membrane: adhesive and mechanical fastening.
In the adhesive method, a specially formulated adhesive is applied to the roof deck before the EPDM membrane is laid down. The adhesive creates a strong bond between the membrane and the roof, ensuring it stays in place over time. This method is often preferred for its sleek appearance, as it leaves no visible fasteners. Once the adhesive is applied, the membrane is carefully pressed into place, ensuring full contact with the adhesive.
The mechanical fastening method involves securing the membrane to the roof deck with fasteners, such as screws or nails. These fasteners are placed around the perimeter of the roof and at intervals across the surface to hold the membrane in place. The fasteners are typically covered with a strip of membrane to hide them from view, maintaining the roof’s aesthetic appeal. This method is commonly used for larger commercial applications or when the adhesive method is not feasible due to temperature or environmental conditions.
Whichever method is used, it’s crucial to ensure that the EPDM membrane is properly secured to avoid any movement or lifting during high winds or storms. Properly securing the membrane also helps to maintain its integrity over time, ensuring long-term performance.
Sealing the Edges and Seams
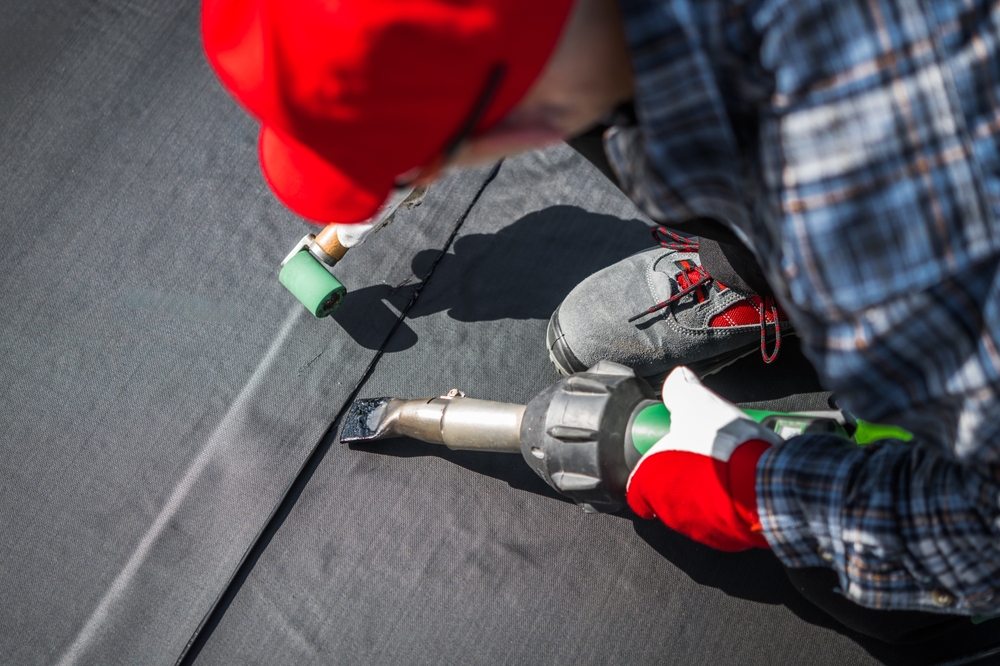
One of the most critical steps in the EPDM roofing installation process is sealing the edges and seams of the membrane. These areas are most susceptible to leaks and require careful attention to detail. To seal the seams, a special adhesive or tape designed for EPDM membranes is used. This adhesive creates a strong, waterproof seal between the sheets of membrane.
The edges of the EPDM membrane should also be properly sealed to ensure that water cannot penetrate under the edges. The edge of the membrane is typically turned up along the perimeter of the roof and secured with additional adhesive or fasteners. Flashing materials may also be used at the edges to further protect against water infiltration. Flashing is particularly important around roof penetrations like vents, skylights, or chimneys, as these areas are vulnerable to leaks. Flashing materials are designed to create a watertight seal around these penetrations, protecting the roof from moisture damage.
Sealing the seams and edges of the EPDM membrane properly ensures the roof is completely waterproof. Any small gaps or areas left unsealed can lead to leaks over time, which can cause significant damage to the underlying structure and interior of the building. Therefore, the sealing process should be carried out with great care to ensure a reliable, long-lasting roof.
Final Inspection and Maintenance
After completing the installation, it’s important to conduct a final inspection to ensure that everything has been done correctly. This inspection involves checking all seams and edges for proper adhesion and sealing. Additionally, the surface of the EPDM membrane should be checked for any signs of damage or wrinkles that could affect its performance. Any issues should be addressed immediately to prevent problems in the future.
Once the inspection is complete and the roof is deemed to be in good condition, the final step is to maintain the EPDM roofing system. EPDM roofs are known for their durability and low maintenance requirements. However, regular inspections are still necessary to ensure the roof continues to perform well. It’s important to check the roof for any signs of damage, particularly after severe weather conditions. Small punctures or cracks in the membrane should be repaired promptly to prevent water from entering the roof system. Routine cleaning and maintenance, such as removing debris and checking for standing water, will also help extend the lifespan of the roof.
Conclusion
EPDM roofing is a reliable and cost-effective option for flat or low-slope roofs. The EPDM roofing installation steps, when followed carefully, ensure a waterproof, long-lasting roofing system. With proper installation, maintenance, and attention to detail, an EPDM roof can provide years of protection for your building, with minimal maintenance required. By understanding the installation process and taking the necessary steps to prepare and secure the roof, you can enjoy the benefits of EPDM roofing for many years to come.
Need a Roofing Company in Springfield, MA?
Since 1987, R & H Roofing has remained one of the most trusted names in the roofing industry. We specialize in commercial and industrial roofing and offer a wide variety of roofing systems including EPDM systems, TPO Systems, Metal Roofing Systems, BUR Tar & Gravel Systems, Asphalt Shingles, and PVC Systems. We also work with some of the leading manufacturers including Firestone, Carlisle, Duro-last, and Garland. Contact us today to learn more about what we can do for you!
Categorised in: EPDM Roofing
This post was written by admin